REQUIRED UNITS:
|
 5x
5x


 6x
6x 2x
2x
 1007 Recruit [-1007]
 180 Bowman [-180]
 660 Cavalry [-660]
 620 Mounted Swordsman [-599]
 20 Knight [-20]
 24 Marksman [-24]
 120 Armored Marksman
 448 Mounted Marksman
 102 Besieger
REQUIRED SKILLS:
 |
 |
 |
 |
 |
| 270 | NUS | VAR | ANS | MCH |
 Juggernaut 3/3 Juggernaut 3/3 Overrun 3/3 Overrun 3/3 Battle Frenzy 3/3 Battle Frenzy 3/3 Unstoppable Charge 3/3 Unstoppable Charge 3/3 Garrison Annex 3/3 Garrison Annex 3/3 Master Planner 1/1 Master Planner 1/1 |
 Rapid Fire 3/3 Juggernaut 3/3 Rapid Fire 3/3 Juggernaut 3/3 Sniper Training 2/3 Unstoppable Charge 3/3 Garrison Annex 3/3 Master Planner 1/1 Sniper Training 2/3 Unstoppable Charge 3/3 Garrison Annex 3/3 Master Planner 1/1 |
Juggernaut 3/3 Overrun 3/3 Battle Frenzy 3/3 Unstoppable Charge 3/3 Garrison Annex 3/3 Master Planner 1/1 |
Juggernaut 3/3 Overrun 3/3 Battle Frenzy 3/3 Unstoppable Charge 2/3 Garrison Annex 3/3 Weekly Maintenance 2/3 Master Planner 1/1 Weekly Maintenance 2/3 Master Planner 1/1 |
Juggernaut 3/3 Overrun 3/3 Unstoppable Charge 3/3 Garrison Annex 3/3 Master Planner 1/1 |
REQUIRED RESOURCES
100  |
Quests in Adventure:
| Mission Name | Mission Description |
| Agitated Wildlife | Defeat all Wildlife Leader Caves Camps. |
| Operation | Collect 5 Ore  Fill the wolf’s stomach with Heavy STones  |
| Relaxing Tea | Collect 5 Heart Fruit  Give Grandma a Relaxing Tea. |
| Payback Time | Defeat all Dark Cult Leaders Camps |
| Royal Clash | Defeat the Evil Queen! |
Buffs in Provision House:
| Appearance | Name | Costs | Production Time | |
| Provision House | Rarity Provision House | |||
 |
Heavy Stones | 5 = |
|
|
 |
Relaxing Tea | 100 + 5 =  |
||
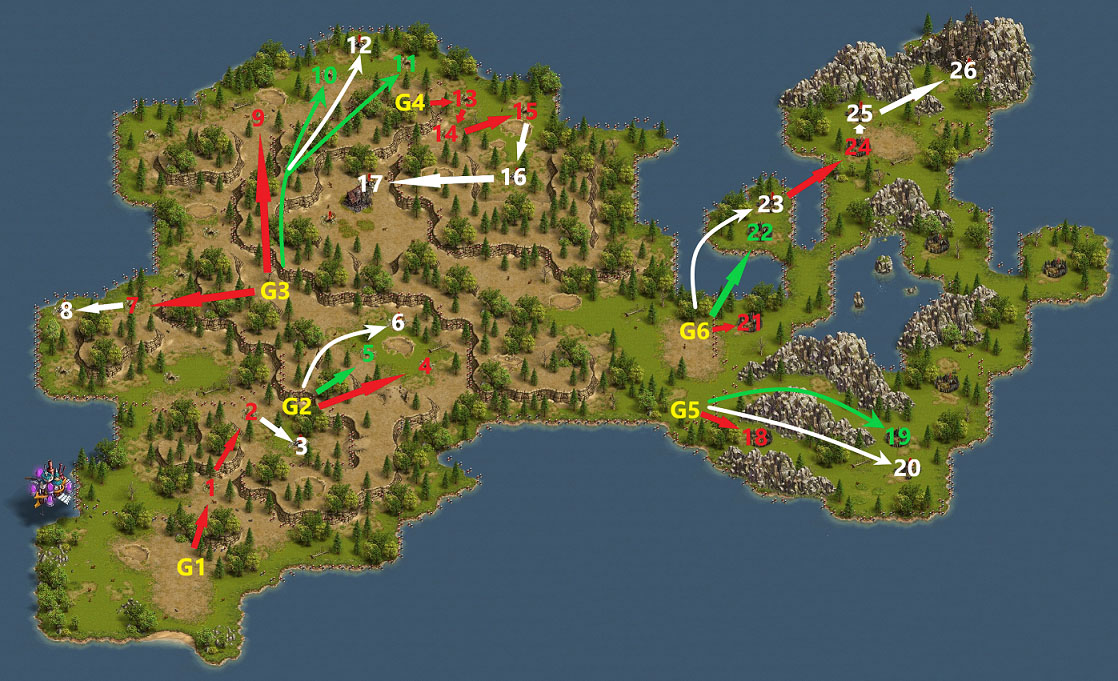

| Garrison | Camp | Enemy Units | Our Attacks |
| G1 | 1 | 200 Fox, 150 Wolf Packleader | 1 wave (VAR) 29 Mounted Swordsman, 166 Mounted Marksman [losses: 28MS] |
| G1 | 2 | 150 Boar, 100 Wolf Packleader | 1 wave (MCH) 215 Mounted Marksman (can use a (270) instead) [losses: 0] |
| G1 | 3 | 200 Wolf Packleader, 150 Boar, 50 Giant, Giant Bogor | 1 wave (270) 17 Mounted Swordsman, 268 Mounted Marksman [losses: 17MS] |
| G2 | 4 | 400 Boar | 1 wave (270) 27 Mounted Swordsman, 258 Mounted Marksman [losses: 27MS] |
| G2 | 5+6 | 300 Fox, 250 Wolf Packleader, 150 Bear, 100 Wolf Packleader, 150 Fox, Furious Boar | BLOCK |
| G3 | 7 | 200 Wolf, 150 Bear | 1 wave (270) 285 Mounted Marksman [losses: 0] |
| G3 | 8 | 200 Wolf Packleader, 100 Bear, Unicorn, Furious Boar | 1 wave (270) 4 Mounted Swordsman, 281 Mounted Marksman [losses: 4MS] |
| G3 | 9 | 200 Boar, 100 Fox, 100 Bear | 1 wave (MMA) 220 Cavalry 2 wave (VAR) 49 Mounted Swordsman, 146 Mounted Marksman [losses: 220C, 49MS] |
| G3 | 10+11+12 | 150 Fox, 150 Wolf, 150 Wolf Packleader, 150 Boar, 150 Fox, 100 Bear, 200 Giant, 100 Bear, Furious Boar | BLOCK |
| G4 | 13 | 200 Wolf Packleader, 100 Wolf, 100 Bear | 1 wave (270) 31 Mounted Swordsman, 254 Mounted Marksman [losses: 30MS] |
| G4 | 14 | 300 Bear | 1 wave (270) 45 Mounted Swordsman, 240 Mounted Marksman [losses: 44MS] |
| G4 | 15 | 300 Bear | 1 wave (270) 45 Mounted Swordsman, 240 Mounted Marksman [losses: 44MS] |
| G4 | 16 | 200 Boar, 100 Wolf Packleader, 150 Giant, Giant Gogor, Giant Bogor | 1 wave (200Fast) 200 Recruit 2 wave (270) 51 Mounted Swordsman, 234 Mounted Marksman (can use any fast General with 200R in wave 1) [losses: 200R, 50MS] |
| G4 | 17 | 200 Bear, 50 Wolf, 50 Giant, 50 Wolf Packleader | 1 wave (MMA) 220 Recruit 2 wave (270) 16 Mounted Swordsman, 269 Mounted Marksman [losses: 220R, 15MS] |
| G5 | 18 | 100 Royal Cavalry, 100 Royal Bowman, 200 Royal Longbowman | 1 wave (VAR) 20 Mounted Swordsman, 155 Mounted Marksman, 20 Besieger [losses: 20MS] |
| G5 | 19+20 | 200 Royal Recruit, 175 Royal Militia, 175 Royal Militia, 100 Royal Recruit, 50 Royal Cannoneer, Royal Juggernaut | BLOCK |
| G6 | 21 | 150 Royal Militia, 150 Royal Recruit | 1 wave (270) 37 Mounted Swordsman, 248 Mounted Marksman [losses: 37MS] |
| G6 | 22+23 | 200 Royal Cavalry, 100 Royal Recruit, 100 Royal Bowman, 100 Royal Longbowman, 150 Royal Militia, 100 Royal Cavalry, Royal Captain | BLOCK |
| G6 | 24 | 250 Royal Longbowman, 100 Royal Cavalry | 1 wave (VAR) 20 Mounted Swordsman, 155 Mounted Marksman, 20 Besieger [losses: 20MS] |
| G6 | 25 | 200 Royal Recruit, 200 Royal Militia, Assassine, Iron Fist | 1 wave (VAR) 195 Recruit 2 wave (MMA) 220 Recruit 3 wave (270) 55 Mounted Swordsman, 24 Marksman, 206 Mounted Marksman [losses: 415R, 54MS, 24M] |
| G6 | 26 | 250 Royal Militia, 150 Royal Longbowman, Ilsebille The Evil Queen | 1 wave (NUS) 180 Bowman 2 wave (ANS) 165 Recruit 3 wave (270) 18 Mounted Swordsman, 267 Mounted Marksman [losses: 180Bow, 165R, 18MS] |
BLOCKS:
See how to make blocks
More information can be found in the guide: How Make Blocks
Remember blocks you do on your own responsibility, there is always a risk that the block can fail.
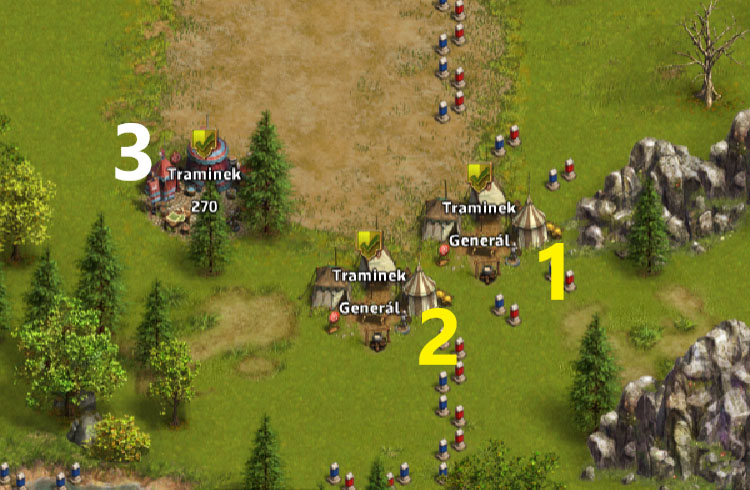
Camp 5Camp 10 and 11Camp 19Camp 22
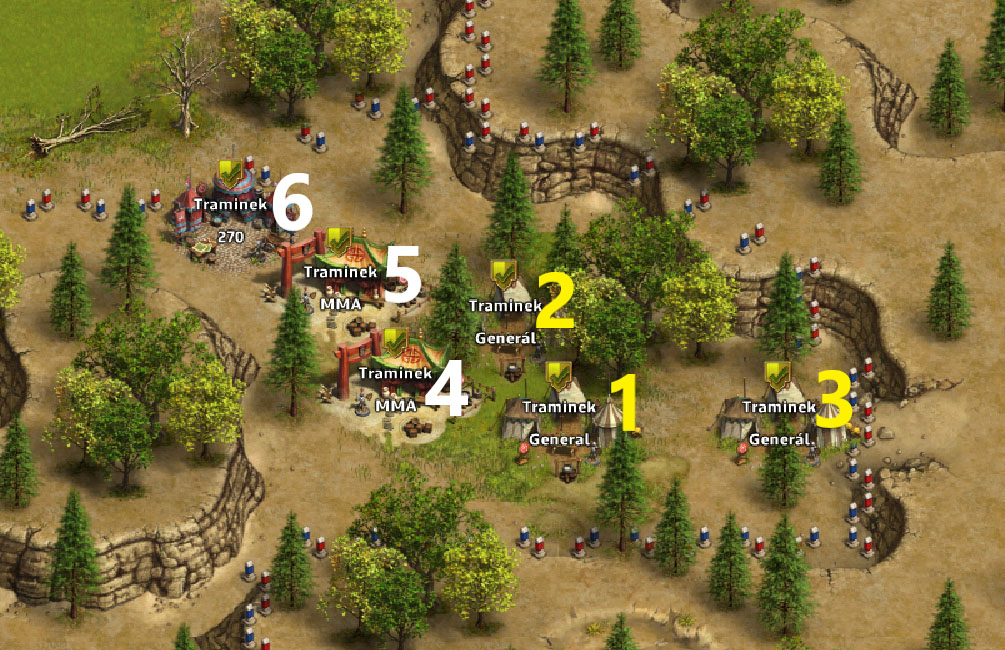
Send generals in the right order as soon as possible (do NOT wait between attacks).
From Garrison 1 send General (200) (1 Recruit) to camp 5
From Garrison 2 send General (200) (35 Mounted Swordsman, 165 Mounted Marksman) to Camp 5
From Garrison 3 send General (200) (1 Recruit) to Camp 5
From Garrison 4 send General (MMA) (1 wave 220 Cavalry) to Camp 6
From Garrison 5 send General (MMA) (2 wave 220 Cavalry) to Camp 6
From Garrison 6 send General (270) (3 wave 2 Mounted Swordsman, 283 Mounted Marksman) to Camp 6
(losses: 440C, 2R, 1MS)
From Garrison 1 send General (200) (95 Mounted Swordsman, 105 Mounted Marksman) to Camp 10, shortly after
from Garrison 2 send General (200) (165 Mounted Swordsman) to Camp 11, shortly after
from Garrison 3 send General (270) (1 wave 29 Mounted Swordsman, 120 Armored Marksman, 136 Mounted Marksman) to Camp 12
(losses: 28MS)
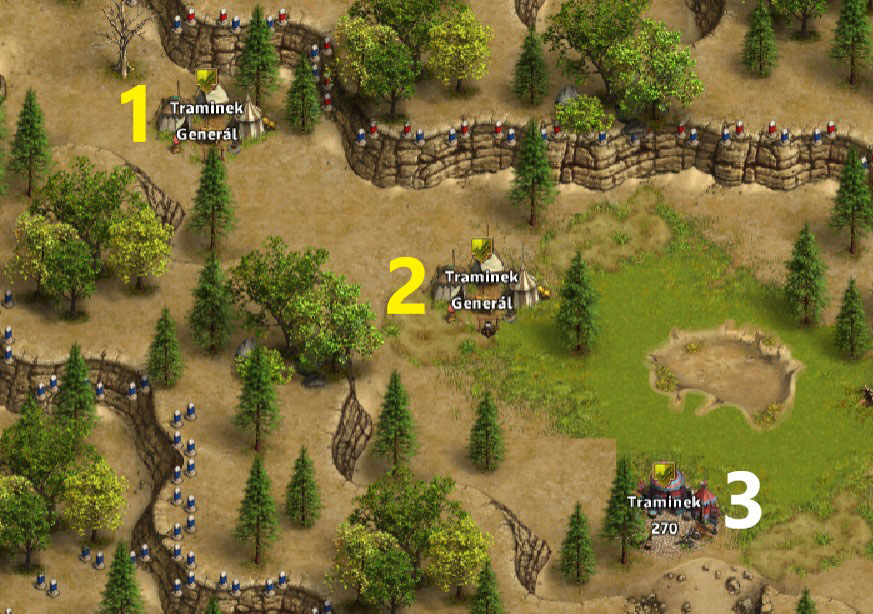
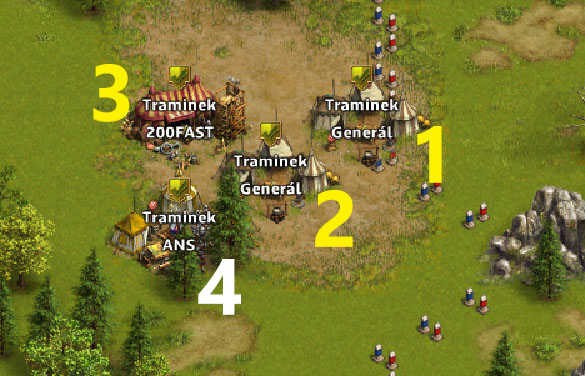
Send generals in the right order as soon as possible (do NOT wait between attacks).
From Garrison 1 send General (200) (1 Recruit) to Camp 19.
From Garrison 2 send General (200) (1 Recruit) to Camp 19.
From Garrison 3 send General (270) (1 wave 71 Mounted Swordsman, 214 Mounted Marksman) to Camp 20.
(losses: 2R, 70MS)
Send generals in the right order as soon as possible (do NOT wait between attacks).
From Garrison 1 send General (200) (1 Recruit) to camp 22
From Garrison 2 send General (200) (1 Recruit) to camp 22
From Garrison 3 send General (200Fast) (1 Recruit) to camp 22
From Garrison 4 send General (ANS) (1 wave 43 Mounted Swordsman, 20 Knight, 102 Besieger) to Camp 23
(losses: 3R, 43MS, 20K)
Thank you for this guide! I especially like the block you did in the area of camps 19-20. I used 2 MOD in place of G2 (because I ran out of normal generals), and it worked great.
The reason I ran out of normal generals is because I did MELIN’s C15 block — and that worked great too.
Thank you so much for sharing!
Hello again ^^
It’s also possible to make 3 shorts blocks on Camp 15
to attack camps 16 and 17 !!
Here is the screen : https://www.casimages.com/i/190115031034523123.jpg.html
Send all generals as fast as possible : 1, 2 and 3 (200) 1 R on Camp 15,
4 (2 wave 270) + 5 (1 wave 200) on Camp 16
and 6 (2 wave 270) + 7 (1 wave MMA) on Camp 17
Enjoy !!
Hello and thanks for your good job !!
It’s possible to make a Long Block on Camp 1 to attack camp 2 and Boss 3
using a 200 general up to 205 units ^^
Here is the screen : casimages.com/i/190115033620179641.jpg.html
Whith 149 MS, 6 K and 46 MM (160-180 seconds), send General 1 to Camp 1…
When he reaches the red circle, send without delay
MCH (215 MM) on Camp 2 and General 270 (19 MS 266 MM) on Boss 3
The destruction’s bar appears sometimes on Camp 1 but it always works !!
Enjoy ^^
Hi,
thanks for the gread guide 🙂
On the castle I lost 18 MM with the above attacks. But I attacked it before clearing the camp before, maybe related?
Hallo Leslie and thank you for your comment.
All blocks are risky, thats why you do them all on your risk 🙂 .
Never had problems with this block (as i know from my server, no one did),
the Gen200 lasts for 60 sec, which should be more than enough for the other Gen to finish the fight.
Have a nice day, Traminek
Camp 10, 11 block, is a risky block
General (200) (165 Mounted Swordsman) may lose the battle!!!!