REQUIRED UNITS:
|
 3x
3x


 2x
2x 6x
6x
 6 Recruit
 600 Mounted Swordsman [-133]
 92 Armored Marksman
 800 Mounted Marksman
REQUIRED SKILLS:
 |
 |
 |
 |
| 285 | MMA | NUS | VAR |
 Juggernaut 3/3 Juggernaut 3/3 First Aid 3/3 First Aid 3/3 Overrun 3/3 Overrun 3/3 Battle Frenzy 3/3 Battle Frenzy 3/3 Unstoppable Charge 3/3 Unstoppable Charge 3/3 Garrison Annex 3/3 Garrison Annex 3/3 Master Planner 1/1 Master Planner 1/1 |
Juggernaut 3/3 First Aid 3/3 Unstoppable Charge 3/3 1-Up 1/1 1-Up 1/1 |
Juggernaut 3/3 First Aid 3/3 Overrun 2/3 Battle Frenzy 2/3 Unstoppable Charge 3/3 Garrison Annex 3/3 Master Planner 1/1 |
Juggernaut 3/3 First Aid 3/3 Overrun 3/3 Battle Frenzy 3/3 Unstoppable Charge 3/3 Garrison Annex 3/3 Master Planner 1/1 |
 |
 |
 |
 |
| ANS | MCH | Dracul | 200 |
| Juggernaut 3/3 First Aid 3/3 Overrun 3/3 Battle Frenzy 3/3 Unstoppable Charge 3/3 Garrison Annex 3/3 Master Planner 1/1 |
Juggernaut 3/3 First Aid 3/3 Overrun 2/3 Battle Frenzy 1/3 Unstoppable Charge 3/3 Garrison Annex 3/3 |
First Aid 3/3 1-Up 1/1 |
First Aid 3/3 1-Up 1/1 |

With regards to blocking using a number of generals with 1 recruit, you do not need the 1-up skill to pull off blocks 2 and 3.
All you really need is a total combat time of 100 seconds for each block, so any standard generals will do.
I use the 1-up skill so I do not need to use as many generals.
The max losses is 133 Mounted Swordsman and using MCH I get over 260k experience and a big bag of star coins
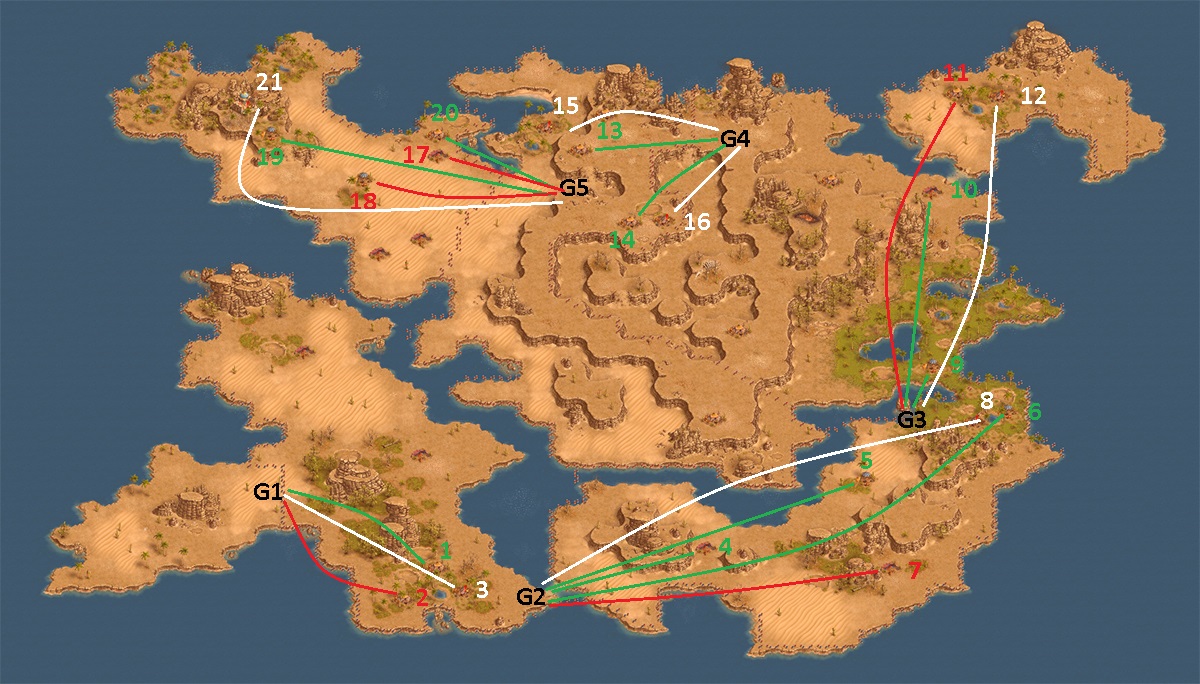
| Garrison | Camp | Enemy Units | Our Attacks |
| G1 | 1 | 180 Sword Wielder | BLOCK |
| G1 | 2 | 110 Desert Marksman, 100 Stone Cannon | 1 wave (MCH) 215 Mounted Marksman [losses: 0] |
| G1 | 3 | 120 Horseman, 80 Desert Marksman, Shrewd Thief | 1 wave (MMA) 1 Mounted Marksman 2 wave (MMA) 1 Mounted Marksman 3 wave (ANS) 20 Mounted Swordsman, 145 Mounted Marksman [losses: 20MS] |
| G2 | 4 | 80 Sword Wielder, 80 Mounted Bowman | BLOCK |
| G2 | 5 | 150 Sword Master | BLOCK |
| G2 | 6 | 70 Horseman, 70 Sword Wielder, 50 Dune Marksman | BLOCK |
| G2 | 7 | 90 Sword Clasher, 100 Desert Marksman | 1 wave (MCH) 215 Mounted Marksman [losses: 0] |
| G2 | 8 | 80 Horseman, 90 Dune Marksman, Greedy Thief | 1 wave (ANS) 20 Mounted Swordsman, 145 Mounted Marksman [losses: 20MS] |
| G3 | 9 | 80 Mounted Bowman, 90 Sword Clasher | BLOCK |
| G3 | 10 | 70 Horseman, 70 Sword Wielder | BLOCK |
| G3 | 11 | 90 Sword Clasher, 90 Stone Cannon | 1 wave (MCH) 215 Mounted Marksman [losses: 0] |
| G4 | 12 | 80 Horseman, 80 Dune Marksman, Mysterious Thief | 1 wave (ANS) 20 Mounted Swordsman, 145 Mounted Marksman [losses: 20MS] |
| G4 | 13 | 70 Sword Master, 60 Dune Marksman, 50 Horseman | BLOCK |
| G4 | 14 | 70 Mounted Bowman, 70 Desert Marksman | BLOCK |
| G4 | 15 | 90 Sword Clasher, 80 Horseman, Treacherous Thief | 1 wave (MMA) 1 Mounted Marksman 2 wave (MCH) 30 Mounted Swordsman, 185 Mounted Marksman [losses: 30MS] |
| G4 | 16 | 90 Desert Marksman, 90 Horseman, Smart Thief | 1 wave (ANS) 20 Mounted Swordsman, 145 Mounted Marksman [losses: 20MS] |
| G5 | 17 | 90 Desert Marksman, 90 Mounted Bowman | 1 wave (VAR) 23 Mounted Swordsman, 172 Mounted Marksman [losses: 23MS] |
| G5 | 18 | 100 Desert Marksman, 100 Stone Cannon | 1 wave (MCH) 215 Mounted Marksman [losses: 0] |
| G5 | 19 | 70 Sword Master, 40 Desert Marksman, 50 Sword Wielder | BLOCK |
| G5 | 20 | 180 Sword Wielder | BLOCK |
| G5 | 21 | 80 Horseman, 80 Stone Cannon, Bandit Lord | 1 wave (MMA)x3 1 Mounted Marksman 2 wave (NUS) 1 Mounted Marksman 3 wave (VAR) 1 Mounted Marksman 4 wave (ANS) 1 Mounted Marksman 5 wave (MCH) 1 Mounted Marksman 6 wave (285) 285 Mounted Marksman [losses: 0] |
BLOCKS:
See how to make blocks
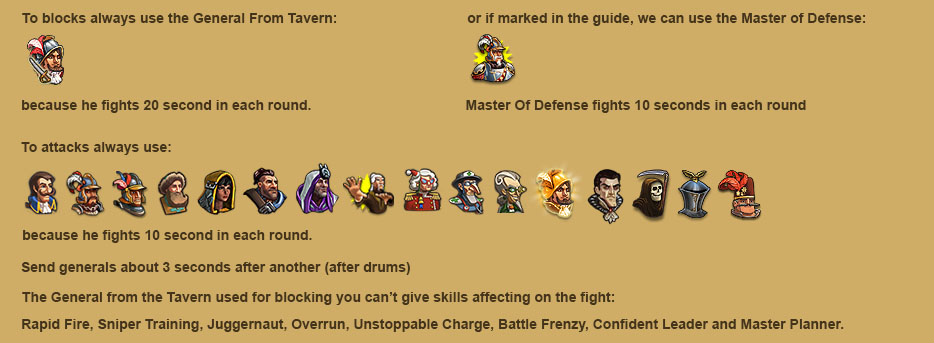
More information can be found in the guide: How Make Blocks
Remember blocks you do on your own responsibility, there is always a risk that the block can fail.
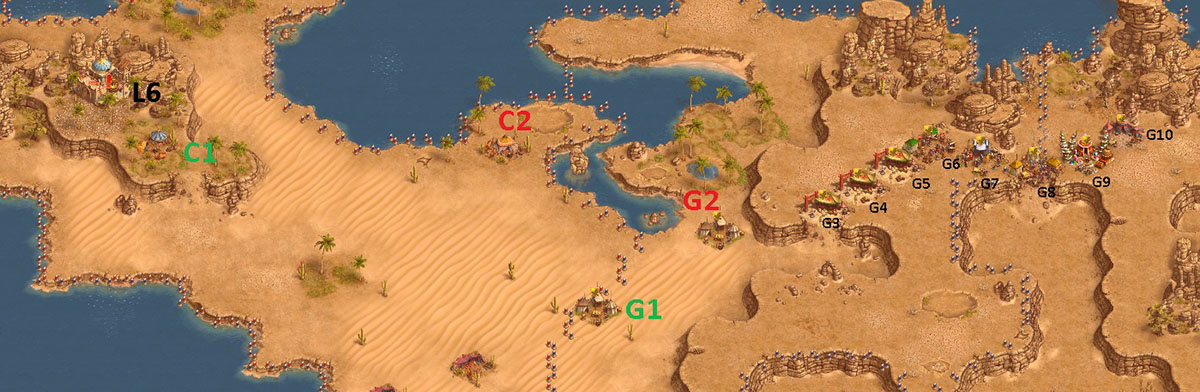
Camp 1Camp 4-6Camp 9 and 10Camp 13 and 14Camp 19 and 20
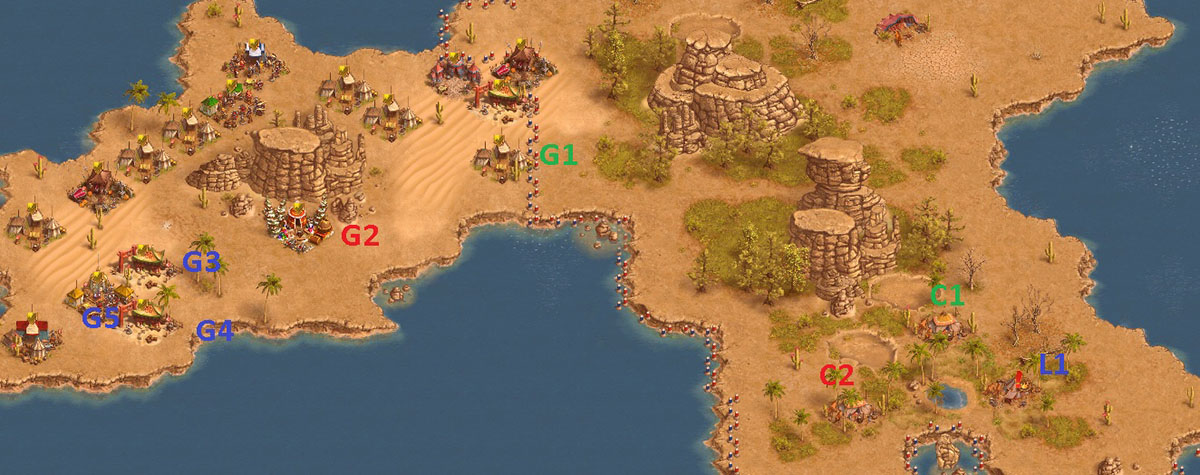
Send all generals straight after each other.
From G1 (195 Mounted Swordsman) send to C1.
G2 (MCH) (215 Mounted Marksman) send to C2.
G3 and G4 (MMA) (1 Mounted Marksman) then from
G5 (ANS) (20 Mounted Swordsman, 145 Mounted Marksman) send to L1

From G1-G6 (1 Recuit x6) send to C1. (Keep the generals close to each other)
When the first general reaches the Green circle send from
G7 (200 Mounted Swordsman) send to C2,
G8 (150 Mounted Swordsman, 40 Armored Marksman) send to C3,
G9 (ANS) (20 Mounted Swordsman, 145 Mounted Marksman) send to L2
then G10 (MCH) (215 Mounted Marksman) send to C4
(send G7-G10 straight after each other)
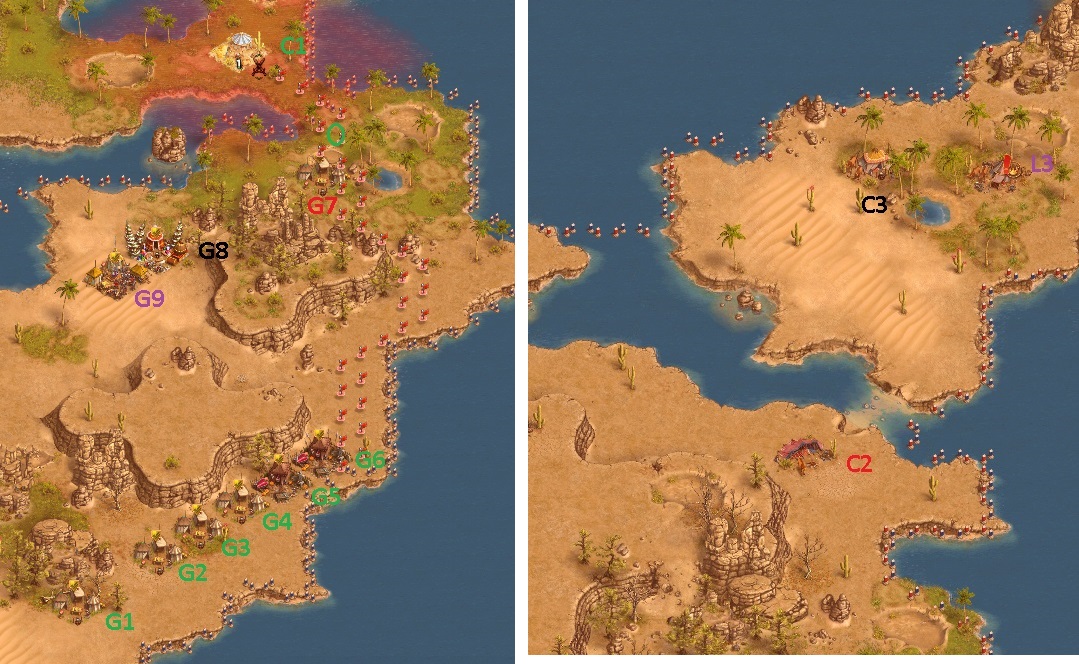
From G1-G6 (1 Recuit x6) send to C1. (Keep the generals close to each other)
When the first general reaches the Green circle send from
G7 (150 Mounted Swordsman, 10 Armored Marksman) send to C2,
G8 (MCH) (215 Mounted Marksman) send to C3,
G9 (ANS) (20 Mounted Swordsman, 145 Mounted Marksman) send to L3
(send G7-G9 straight after each other)
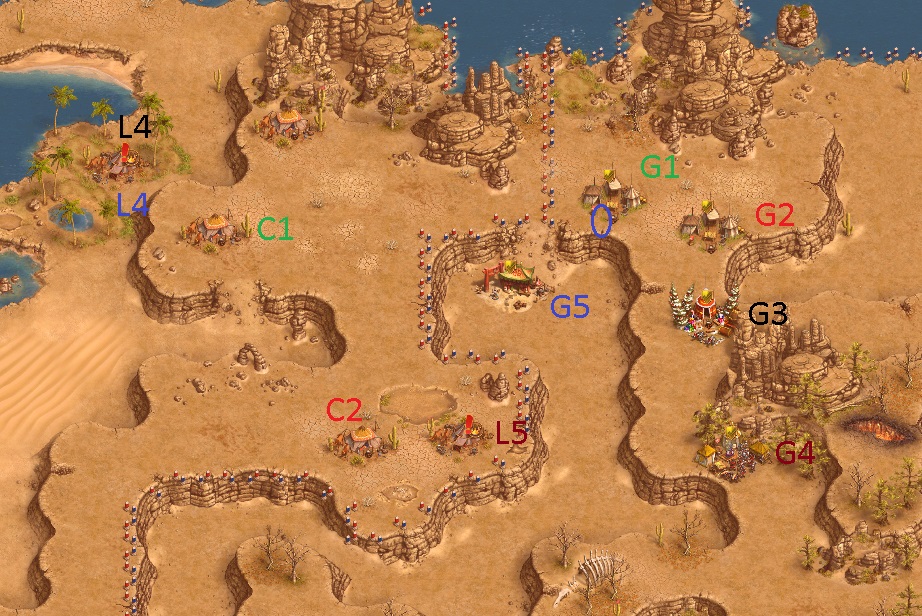
From G1 (162 Mounted Swordsman, 37 Armored Marksman) send to C1,
G2 (123 Mounted Swordsman) send to C2,
G3 (MCH) (30 Mounted Swordsman, 185 Mounted Marksman) send to L4
G4 (ANS) (20 Mounted Swordsman, 145 Mounted Marksman) send to L5
(send G1-G4 straight after each other)
When G2 reaches the blue circle send
G5 (MMA) (1 Mounted Marksman) to L4
Send all generals straight after each other.
From G1 (150 Mounted Swordsman, 40 Armored Marksman) send to C1
G2 (195 Mounted Swordsman) send to C2
G3-G5 (MMA)x3 (1 Mounted Marksman)
G6 (NUS) (1 Mounted Marksman)
G7 (VAR) (1 Mounted Marksman)
G8 (ANS) (1 Mounted Marksman)
G9 (MCH) (1 Mounted Marksman)
G10 (285) (285 Mounted Marksman) send to L6