REQUIRED UNITS:
|


 3x
3x
 155 Recruit [-141]
 1.000 Swordsman [-282]
 230 Knight [-30]
 1.335 Mounted Marksman
 523 Mounted Swordsman
 72 Armored Marksman
REQUIRED SKILLS:
 |
 |
 |
 |
| GHOST | TB | YGG | FRO |
 First Aid 3/3 First Aid 3/3 Juggernaut 3/3 Juggernaut 3/3 Overrun 3/3 Overrun 3/3 Battle Frenzy 1/3 Battle Frenzy 1/3 Unstoppable Charge 3/3 Unstoppable Charge 3/3 Garrison Annex 3/3 Garrison Annex 3/3 Master Planner 1/1 Master Planner 1/1 |
Juggernaut 3/3 Unstoppable Charge 3/3 Garrison Annex 3/3 Master Planner 1/1 |
First Aid 3/3 Juggernaut 3/3 Overrun 3/3 Battle Frenzy 3/3 Garrison Annex 3/3 |
First Aid 3/3 Juggernaut 3/3 Overrun 3/3 Battle Frenzy 3/3 Garrison Annex 3/3 |
 |
 |
 |
|
| LON | STF | OGG | |
| First Aid 3/3 Juggernaut 2/3 Overrun 3/3 Battle Frenzy 3/3 Unstoppable Charge 3/3 Garrison Annex 3/3 Master Planner 1/1 |
First Aid 3/3 Juggernaut 3/3 Overrun 3/3 Battle Frenzy 1/3 Unstoppable Charge 3/3 Garrison Annex 3/3 |
First Aid 3/3 Overrun 3/3 Battle Frenzy 2/3 Unstoppable Charge 3/3 Garrison Annex 3/3 Master Planner 1/1 |
|
The main bonus of this version is the time, but requires more generals and more available troops. Can be done in 20-25 minutes after the start of the first attack. Also using only 3 blocking generals, allows you to play in a row next YWC adventure (you have another 3 tavern generals available on your island). If you don’t use Tremble Beard general, then skip the attack on camp 2, send only the attack on camp 3. To save time is very important order of attacks and movement of your generals between redeploying of their garrisons. This version use only one redeploy, from G1 to G2.
Can be done with different generals with proper load. Use a simulator to solve the necessary load.
Losses are an average value with recovery skills applied. Using of Tremble Beard reward you with additionally star coins and mercenaries.
Before doing the attacks table, read carefully the instructions within blockings section to achieve the best timing and to avoid mistakes.
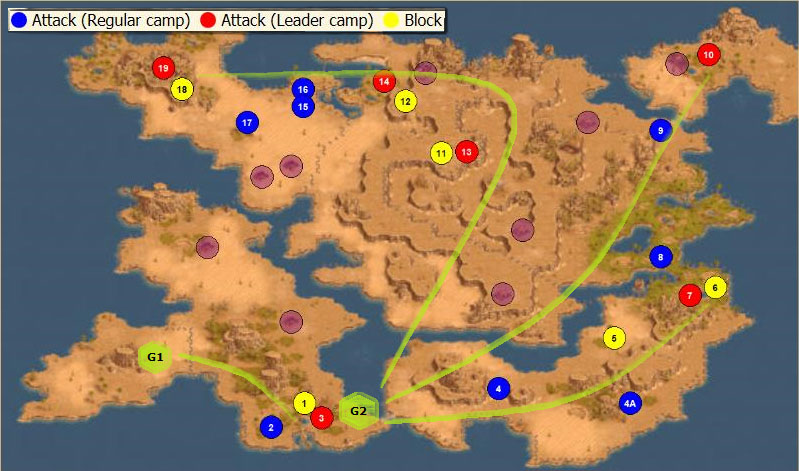
| Garrison | Camp | Enemy Units | Our Attacks |
| G1 | 1 | 180 Sword Wielder | 1 wave (GEN) 195 Mounted Swordsman (BLOCK) |
| G1 | 2 | 110 Desert Marksman, 100 Stone Cannon | 1 wave (FRO) 1 Recruit 1 wave (TB) 175 Mounted Marksman [losses: 0] |
| G1 | 3 | 120 Horseman, 80 Desert Marksman, Shrewd Thief | 1 wave (GHOST) 70 Swordsman, 160 Mounted Marksman [losses: 33S] |
| G2 | 4 | 80 Sword Wielder, 80 Mounted Bowman | 1 wave (GHOST) 230 Swordsman [losses 43S] |
| G2 | 4A | 90 Sword Clasher, 100 Desert Marksman | 1 wave (TB) 175 Mounted Marksman [losses: 0] |
| G2 | 5 | 150 Sword Master | 1 wave (GEN) 195 Mounted Swordsman (BLOCK) |
| G2 | 6 | 70 Horseman, 70 Sword Wielder, 50 Dune Marksman | 1 wave (GEN) 164 Mounted Swordsman, 36 Armored Marksman (BLOCK) |
| G2 | 7 | 80 Horseman, 90 Dune Marksman, Greedy Thief | 1 wave (GHOST) 70 Swordsman, 160 Mounted Marksman [losses: 22S] |
| G2 | 8 | 80 Mounted Bowman, 90 Sword Clasher | 1 wave (GHOST) 230 Knight [losses: 30K] |
| G2 | 9 | 70 Horseman, 70 Sword Wielder | 1 wave (STF) 50 Swordsman, 185 Mounted Marksman [losses: 39S] |
| G2 | 10 | 80 Horseman, 80 Dune Marksman, Mysterious Thief | 1 wave (GHOST) 70 Swordsman, 160 Mounted Marksman [losses: 28S] |
| G2 | 11 | 70 Mounted Bowman, 70 Desert Marksman | 1 wave (GEN) 120 Mounted Swordsman (BLOCK) |
| G2 | 12 | 70 Sword Master, 60 Dune Marksman, 50 Horseman | 1 wave (GEN) 164 Mounted Swordsman, 36 Armored Marksman (BLOCK) |
| G2 | 13 | 90 Desert Marksman, 90 Horseman, Smart Thief | 1 wave (GHOST) 70 Swordsman, 160 Mounted Marksman [losses: 25S] |
| G2 | 14 | 90 Sword Clasher, 80 Horseman, Treacherous Thief | 1 wave (GHOST) 70 Swordsman, 160 Mounted Marksman [losses: 25S] |
| G2 | 15 | 90 Desert Marksman, 90 Mounted Bowman | 1 wave (GHOST) 230 Swordsman [losses 42S] |
| G2 | 16 | 180 Sword Wielder | 1 wave (LON) 45 Swordsman, 200 Mounted Marksman [losses: 25S] |
| G2 | 17 | 100 Desert Marksman, 100 Stone Cannon | 1 wave (TB) 175 Mounted Marksman [losses: 0] |
| G2 | 18 | 70 Sword Master, 40 Desert Marksman, 50 Sword Wielder | 1 wave (GEN) 164 Mounted Swordsman, 36 Armored Marksman (BLOCK) |
| G2 | 19 | 80 Horseman, 80 Stone Cannon, Bandit Lord | 1 wave (YGG) 155 Recruit 1 wave (OGG) 295 Mounted Marksman [losses: 141R] |
BLOCKS:
See how to make blocks
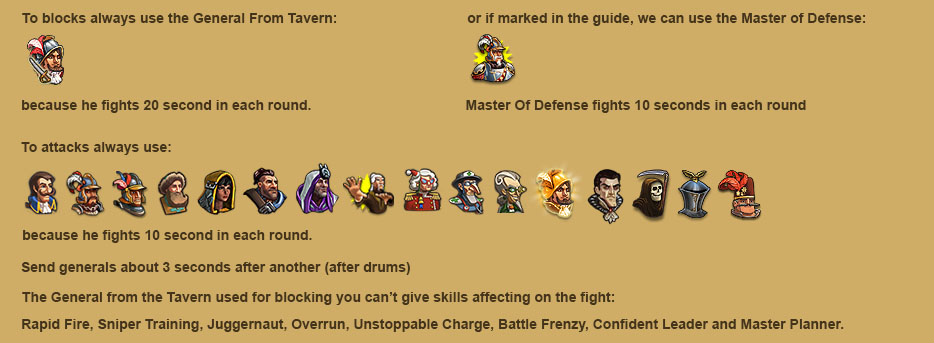
More information can be found in the guide: How Make Blocks
Remember blocks you do on your own responsibility, there is always a risk that the block can fail.
Camp 1-3Camp 4-10Camp 11-19
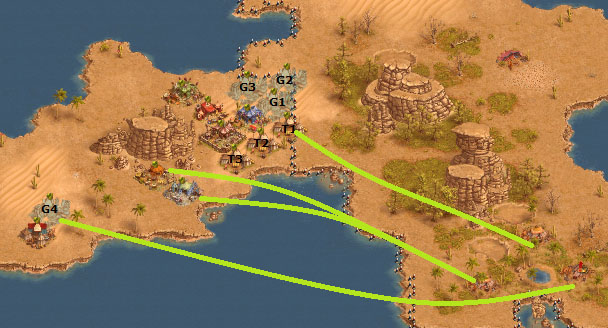
Send T1 to block camp 1. After drum ends, send FRO and TB to camp 2 and G4 to camp 3.
For better timing redeploy in order: G1, G2, G3, T2, T3, T1, TB, STF, LON, YGG, OGG, G4(refill her).
Send G1 to camp 4.
When G1 reaches 9-10 flags distance towards T1, send T1 to camp 5/ T2 to camp 6 / G2 to camp7 / TB to camp 4A.
After G1 returns – change the load – then send her to camp 8.
When G1 reaches 9-10 flags distance towards STF, send STF to camp 9 / G4 to camp 10.
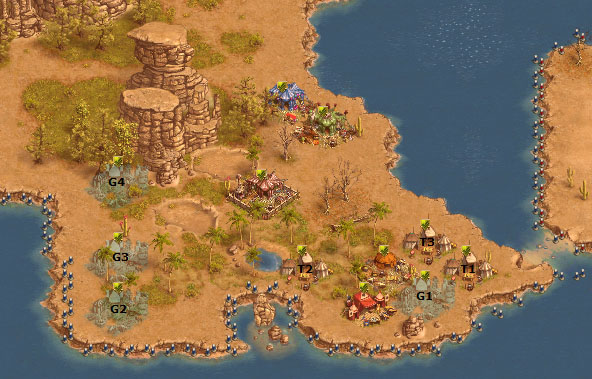
After defeating of leader camp 7, change the load of T1 and refill the G2.
Send T1 to camp 11 / T2 to camp 12/ G2 to camp 13 / G3 to camp 14.
In mean time G1 is back. Change the load.
When G2/G3 are beyond G1, send G1 to camp 15 / LON to camp 16.
When LON is beyond TB, send TB to camp 17.
When TB reaches 9-10 flags distance towards T3, send T3 to camp 18, YGG and OGG to camp 19.
Now enjoy 10 minutes your generals till the end! Is simpler than it looks!